Finger Joint Pain Relief
Quite often, you can actually fix yourself, if someone simply shows you what to do. This page, and this website, are here to do exactly that. Just follow along with the videos below.
Go directly to any Finger Joint Pain Relief video on this page by clicking these links:
Intro,
Video 1,
Video 2,
Video 3 .
Pain Relief Success Story, From Darima:
"Thank you so much showing these methods. I had recurring pains from computer overuse, which I attributed to RSI. I quit my degree and job due to RSI a year ago. Now I am trying to start freelancing, and it was very depressing to get pain again, now in my fingers. I tried working through 3 steps of finger joint pain relief. It is like a miracle, the pain has disappeared! ... I cannot expresson how grateful I am for your work, I am sure it helps millions of people." Darima, United Kingdom
You can do it too!
Click directly to any pain relief video on this page:
Intro,
Video 1,
Video 2,
Video 3 .
*Please Watch This Short Video First. Thanks.
Please visit the techniques page now, if you haven't already.
On the homepage I describe…in detail…the 3 Simple Steps and the 4 Basic Facts about your body that make it possible for you to provide your own joint pain relief.
Detailed Instructions For
Finger Joint Pain Relief
Click directly to any finger joint pain relief video on this page:
Intro, Video 1, Video 2, Video 3 .
Here's what we're going to do in Finger Joint Pain Relief Video 1:
A. Finger Joint Release -
Bend or use your finger in the way that you experience finger joint pain. Just take a moment to really pay attention to where exactly your finger hurts. Is it one particular knuckle or the entire finger? Does it really only hurt on the top of the finger? Or is it really on the sides of the knuckles? Notice exactly where it hurts because that's where we want to start.
When you've had trauma to the joint and it never quite healed, then what we're about to do might be exactly what you need in order to get full function restored to the joint.
The first goal is to identify where you feel tension in the joint when you use it. Then do the press-hold-move technique by opening and closing the joint while you press on the inappropriately tight tissue. It's also good to mix in some press-pull-release technique on the same spot to mix things up a bit.
If you are working on the sides of one of your knuckles, it can be a bit painful, but it's worth it. I know, I've had to do this to myself more than once over the years when I've jammed my knuckle. More than once it wouldn't seem to heal all the way without a little help, and this did the trick.
Take your time, and be willing to take a break and come back to work the joint. It will let go, but knuckles can be a bit stubborn at times after they've been injured.
Once you've released one area, retest and notice if the tension is now felt in a different spot. Then repeat the steps above.
Keep retesting until there is no more tissue restricting the movement of the joint.
How much was your finger joint pain reduced from this technique?
B. Palm of Hand Release -
Now move your finger that is in pain while you press into the palm of your hand with your thumb from the opposite hand. Notice what muscles in the palm of your hand move when you move your finger and press on them to determine if they are tender.
With any tender spots you find, do the press-hold-move technique by opening and closing the finger joint. And then do some of the press-pull-release technique on the tissue as well. Mix it up a bit until the tender areas release.
Notice how much finger joint pain relief this technique provides.
C. Back of Hand Release (optional technique) -
It's rare, in my experience, for finger pain to come from the tissue on the top of your hand. But feel free to check for tender tissue on the back of your hand while you make the painful finger function. Then do the press-hold-move technique. And then do some of the press-pull-release technique on the same spot to mix things up a bit until the tender areas release.
Notice if this provides any finger joint pain relief.
Click directly to any finger joint pain relief video on this page:
Intro,
Video 1,
Video 2,
Video 3 .
If you ARE experiencing numbness or tingling in your fingers then this Step 2 is very important, so please take your time and do it thoroughly. I've found over the years that if you are NOT experiencing numbness or tingling in your fingers there is a good chance that you can skip Step 2 for the moment and go to Step 3. If Step 3 helps to completely eliminate your pain then you're done. If Step 3 doesn't then you can return here to Step 2 and run through the sequence.
Here's what you're going to do:
A. Lower Neck and Shoulder Release -
Do the press-hold-move technique on any painful/tender spots until they release.
Move your head, neck, and arms in any manner that makes the tissue you are pressing on move.
Notice how much finger joint pain relief this technique provides.
B. Underside of Collarbone -
The underside of your collarbone has three main muscles: the pectoralis major and minor muscles, and the often forgotten subclavius ).
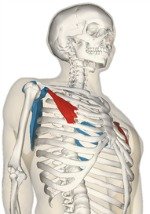
Investigate the entire underside of the clavicle and notice any areas where these muscles are painful when you press on them.
Select any of these tender spots and do the press-pull-release technique with the assist of the hand-on-hand technique.
The press-hold-move technique is also a perfectly good option to try on any tight tissue. Just press on the tissue and maneuver your arm in the way that forces that tight tissue to move.
Feel free to use whatever technique the tight tissue responds to. You never know what works best until you try them both, especially on a stubborn spot.
Was your finger joint pain reduced from releasing this tissue? Make a mental note.
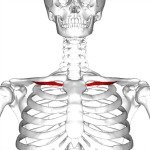
C. Upper Back -
The tennis-ball-press technique is my "go to" technique for my upper back. You basically have two options: lean against the wall with a tennis ball in a sock or lie on the floor with a tennis ball under your upper back.
First do the muscle on the back of your shoulder blade: the infraspinatus muscle. Use the press-hold-move technique by sliding your elbow along the floor or wall while the tennis ball is placed under any tender spots you've found.
Now we'll work on your rhomboid muscle, which is located between the inside edge of your shoulder blade and your spine. Whether leaning against the wall with the ball or lying on the floor with the ball, do the same arm motion you just did for your infraspinatus above, with any tender tissue you find in your rhomboid muscle.
If you can, you always want to try and do both sides of your upper back, since the opposite side being tight can sometimes be part of the problem.
Notice how much finger joint pain relief this technique creates for future reference.
D. Back of Upper Arm Release
Use the press-hold-move technique by straightening and bending your elbow joint to release any tight spots in your triceps.
You can also do the press-pull-release technique on any tender spots. It also tends to work well in this area.
Notice how much finger joint pain relief this technique creates for future reference.
E. Release Elbow Joint
There is a muscle called your brachioradialis, on the inside of your elbow joint that can sometimes be in finger joint pain..
GENTLY press into the front outer half of your elbow and feel the muscle that runs across this part of your elbow joint. Do a gentle press-hold-move technique by flexing and extending your elbow joint.
With your elbow bent you can also do a press-pull-release technique on any tight areas. This muscle usually responds pretty well, so you don't need to press extremely hard.
Did your finger joint pain improve from doing Step 2?
Click directly to any finger joint pain relief video on this page:
Intro,
Video 1,
Video 2,
Video 3 .
Here's what we're going to do:
A. Forearm Release With Thumb -
These muscles in your forearm are called "extrinsic" hand muscles because they operate your hand and finger from "outside" of your hand by using long tendons from your forearm that run all the way down through your wrist to your hands.
We're going to use the press-hold-move technique on all these muscles by pressing your thumb into the tight tissue and opening and closing your hand. This is a great technique for releasing these muscles, but it can tire out your thumb, so take a break when your thumb needs it.
Now just investigate the entire belly of your forearm, release what you can with your thumb, and leave the rest for when we use your elbow in the next technique.
And how much finger joint pain did this technique release? Take note!
B. Forearm Release With Opposite Forearm -
Now we'll do the same thing we just did with your thumb, only now you'll be the 2 to 3 inches of your forearm just down from your elbow.
And just like we did with our thumb, use the press-hold-move technique by opening and closing your fist while pressing on any tight tissue.
Notice if and how much your finger joint pain has improved.
C. Top of Forearm Release With Fingertips -
We're still going to use the press-hold-move technique, but now we'll do the top of our forearm and use your fingertips to apply the pressure.
Now to get the tissue to release under your pressure your going to flex your wrist back and up (toward your shoulder) while you press on the tissue. You should feel the muscles move under your pressure as you extend your wrist and hand back.
Do this motion on any tight tissue you find in the top of your forearm.
Notice if your finger joint pain has improved, and if so, how much it has improved.
D. Top of Forearm Release With Point of Elbow -
So I do want you to be careful as you learn how to do this next version of the press-hold-move technique.
We'll be doing exactly what we just did with your fingertips, now I want you to use the point of your elbow on any stubborn tight spots and see if a bit more pressure will get them to release.
Do the exact same backward flexing motion with your wrist toward your shoulder as you press on the tissue.
How much has your finger pain has improved?
Return from this Finger Joint Pain Relief page to the
Do-It-Yourself Joint Pain Relief Homepage
Finger Joint Pain Relief Success Stories:
"My friend you are a genius I can't tell you how much your videos helped. As a boxer at times I get pain in my hands but for some reason I left my hand wraps at the house ended up jaming my finger at the gym. 2 months later I've still had this pain right down my middle finger and idk why I didn't think about it sooner but I looked up hand exercise for hand pain I'm glad I found yours right on this first video the pain is gone. Ima follow through the rest of the videos better safe than sorry... but thanks bro it really works" - Adrian V., Country Unknown
"Thank you for posting this. I got a new job at a factory and being an artist I get depressed when my fingers hurt. But practicing your methods of relieving hand pain really helped relieve the pain in my fingers and relieve the stiffness." John S., YouTube comment
This Free Pain Relief Website
By Clicking On Your Favorite Icon Below:
Add Gary Crowley to your Google Plus Circles -
Google+ (click here)
Copyright © 2011 - 2022 DiyJointPainRelief.com


