Toe Joint Pain Relief
Thousands of people have already benefited from the techniques offered on these pages, so please do give them a try.
Just follow along with the videos below.
Go directly to any Toe Joint Pain Reliefon video with these links:
Intro,
Video 1,
Video 2,
Video 3 .
Pain Relief Success Story, From Kathleen
"I have had great toe pain for 5 months after a fall. Dr said I had DJD. I didn't accept that. The pain has been almost debilitating. Then...I Googled how to get rid of great toe pain. I watched your videos. Did the stretches. Today was a totally painless day!!!!!! Thank you so very much..." Kathleen, United States
You can do it too!
This short introductory video is a great place to start. It will give you a good overview of how to get the most out of this website and help you get the best possible results from the videos below.
Click directly to any pain relief video on this page:
Intro, Video 1, Video 2, Video 3 .
*Please Watch This Short Video First. Thanks.
Please visit the techniques page now, if you haven't already.
On the homepage I describe…in detail…the 3 Simple Steps and the 4 Basic Facts about your body that make it possible for you to provide your own joint pain relief.
Detailed Instructions For
Toe Joint Pain Relief
A word about "neuromas." If you've been diagnosed with a neuroma or have noticed a little pea sized ball of nerves in the ball of your foot (a common location) then the techniques below may not be what you need. The most effective treatment for a neuroma that I have seen is to wear a little donut shaped cushion over the spot of the neuroma for a couple of months, so it is not aggravated when you put weight on your foot. That usually allows it to release over time and seems to work pretty well.
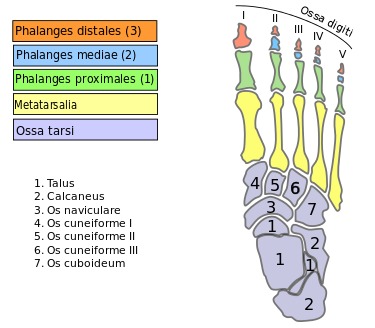
That said, when most people say "toes," they are referring to their phalanges pictured below. Usually, they are in pain because the muscles and soft-tissue that govern them is tight in some way. We will be releasing that tight tissue to relieve your pain.
Click directly to any toe joint pain relief video on this page:
Intro, Video 1, Video 2, Video 3 .
Toe joint pain relief can often be simple if you are just shown the correct techniques. Be patient with yourself……take your time……and most likely you'll be pleasantly surprised with your results.
Here's what we're going to do:
A. Toe Joint Release -
If the pain is primarily in the toe knuckle from some type of trauma, then this is a very important technique for you. If the injury has had sufficient time to heal and the knuckle is still painful to bend then do this Step 1A thoroughly and you should notice great results just from doing this one technique.
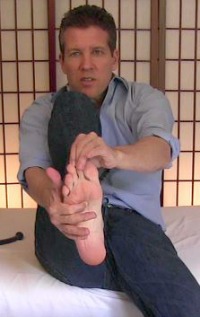
Bend your toe that is experiencing the toe joint pain in the way that makes it hurt. Notice where the tension is that restricts the movement of the joint. If it's on the top of the joint, we'll start there. If it's on the side of the joint, we'll start there, etc. You may have to take your fingers and manually bend the toe if you can't bend it without assistance.
Wherever the tension is, press on the tissue (which should be tender) and do the press-hold-move technique by opening and closing the joint with manual assistance of by itself. And then do some of the press-pull-release technique on the same spot to mix things up a bit.
If you are working on the sides of one of your toe knuckles, it can be a bit painful, but it's worth it. I know, I've had to do this to myself more than once over the years when I've jammed my toe. More than once it wouldn't seem to heal all the way without a little help, and this did the trick.
Take your time, and be willing to take a break and come back to work the toe joint. It will let go, but the toe knuckles can be a bit stubborn at times after they've been injured.
Once you've released one area, retest and notice if the tension is now felt in a different spot. Then repeat the steps above.
Keep retesting until there is no more tissue restricting the movement of the joint.
Notice how much toe joint pain relief this one technique provided.
B. Bottom of Foot Release -
In a sitting position or lying on your back, grab the bottom of your foot with the four fingers from both hands with your thumbs on the top of your foot. Press your fingertips into the bottom of your foot to feel the tissue from the ball of your foot all the way down to about an inch from your heel bone. Notice any particularly tender spots.
Now flex the painful toe back and forth, or manually move it back and forth with one hand, while you press into the bottom of your foot to find the muscle that moves when you move your toe. Feel the whole length of the muscle you found on the bottom of your foot. The ones near the ball of your foot tend to be short. The muscles in the belly of the ball of your foot tend to be a bit longer.
Are any of the muscles you found tender when you press on them? If yes, then do the press-hold-move technique and the press-pull-release technique on any tender tissue.
I do think fingertips are the best tool to release these muscles, but if you have a hard time, try the tennis-ball-press technique with a tennis ball or even a golf ball to get those tight muscles to release.
Notice how much toe joint pain relief this one technique provided.
C. Top Of Foot Release
This will be very similar to what you just did on the bottom of your foot.
Sitting in a chair or lying on back, grab your foot with both hands - thumbs on the top of your foot, fingertips on the bottom of your foot.
Flex your painful toe up and back toward your shin bone either by itself or manually assisted by pulling it up and down with one of your hands. Feel the muscles that flex and relax on the top of your foot that cause your toe to do this motion. Notice if any of them are tender/painful when you apply a bit of pressure to them.
Do the press-hold-move technique and the press-pull-release technique on any tender spots until they release.
How much toe joint pain relief does this one technique provide.
Click directly to anytoe joint pain relief video on this page:
Intro,
Video 1,
Video 2,
Video 3 .
Here's what we're going to do:
A. Passive Low Back Stretch -
The keys to doing this stretch are:
1. make sure you are comfortable when lying in this position. If you are not readjust things so that you are. Many people forget to put a pillow under their head and this can make a big difference.
2. The first time you do this pose only stay in it for 5 minutes or so, just to see how you do. You can increase your time to 10 or 15 minutes later if you find this pose beneficial.
3. Don't forget to support your thighs with with the pillows. It actually makes a pretty big difference in allowing your body to let go.
4. Make sure your butt is touching the floor. You do not want your hips hanging with no suppport.
B. Reclined Hip Stretch -
The key to this stretch is to just do what you can. You will improve over time so don't get frustrated.
As a matter of fact, with these stretches or any others, the ones you have the most difficult time doing are actually the ones you'll probably benefit the most from doing.
C. Seated Hip Stretch -
Just be very careful with your knees when doing this stretch. People who get too aggressive and don't take the time to figure out how to do this so it's easy on the knees can injure themselves. There is no need to rush. Take your time and your knees will be happy you did.
D. Hamstring Stretch -
For this stretch, just remember to flex your quadriceps while you keep your legs very straight. When done properly you should feel this stretch all the way up the backs of your legs and even feel the stretch in your buttocks.
Also, my brand new webpage, Best Hamstring Stretches goes into great detail about how to get the most from hamstring stretches. So, check it out if you need more clarification.
Click directly to any toe joint pain relief video on this page:
Intro,
Video 1,
Video 2,
Video 3 .
A. Front Of Lower Leg Release -
Now we're going to release a muscle in your lower leg that helps to raise your toes.
With your foot flat on floor take you fingertips and using the hand-on-hand technique to get a bit more pressure, press into the tissue in the lower half of your outer shin while you raise and lower your toes. Notice any tender tissue you find.
Now while still using the hand-on-hand technique, do the press-hold-move technique to release any tender tissue.
How much toe joint pain relief did this provide? B. Back of Lower Leg Release -
Now we're going to release a muscle in your lower leg that helps flex your toes downward.
Sitting with your foot pulled up so it hangs off the edge of the seat of your chair (or with your foot on a bench that is pulled very close to you) place both of your thumbs on the back inner half of your lower leg.
Flex your toes downward (like you were trying to pick up a pencil with your toes) repeatedly, and feel into the inner half of the lower two-thirds of your calf with your thumbs to feel the muscles that do that motion.
Now to the press-hold-move technique on any tight tissue by flexing your toes closed and open while you press on any tender spots until they release.
How much toe joint pain relief did this provide?
Self-Assessment Of
Toe Joint Pain Relief
And it's important to try and be as precise and honest as you can with yourself.
How much has your toe joint pain improved from the work you performed?
Was there one area you worked on that seemed to help the most?
Was there one technique that worked best on this area that you want remember for future use?
Are there other areas that could use more work, more time with the techniques to get more of a release from the tight tissue?
Again, make not of the areas you'll want to focus on the next time you work on yourself
Keep up the good work!
Return from this Toe Joint Pain Relief page to the
Do-It-Yourself Joint Pain Relief Homepage
Another Toe Joint Pain Relief Success Story:
"Dear Gary, I just found your site when I googled joint pain treatment. I've only been through a few videos and decided to go straight to the video for big toe pain. I developed pain in my right big toe weeks ago and could hardly bend the toe. I would get an extremely sharp pain when raising my toes or pushing them against the coffee table in front of me.
So far the only thing I did from your video was the press hold and move technique - starting on my calf and working down to the big toe. The result is nothing short of miraculous. I only did it for a few minutes and the pain level went from a 10 to about a 3-4! I will continue with the other techniques until I am pain free.
I can't thank you enough for sharing these easy methods. I have a lot of upper body, back and hip pain and can't wait to try the other techniques for relief.
Again, bless you for your help in getting pain free. I will definitely recommend your site to others!
Sincerely, Annie" - Annie, United States
This Free Pain Relief Website
By Clicking On Your Favorite Icon Below:
Add Gary Crowley to your Google Plus Circles -
Google+ (click here)
Copyright © 2011 - 2022 DiyJointPainRelief.com


