Elbow Joint Pain Relief

What I show you in my videos is very simple to do and highly effective.
These videos are made for the average person. No understanding of anatomy is required.
Go directly to any Elbow Joint Pain Relief video on this page with these links:
Intro,
Video 1,
Video 2,
Video 3 .
Pain Relief Success Stories
"I can not thank you enough...You showed me in 30 short minutes how to alleviate my chronic elbow pain and migraines. Your videos are easy to follow and very effective, I began immediately to feel relief. You are SO generous for sharing your knowledge, thank you again." Letitia, United States
"Thank you so much for your videos!! After I was told that my elbow pain was due to arthritis and I would need to slow down my activities or increase my pain meds, I couldn't believe it! I wasn't willing to just give up. I'm only 50, I still have a lot left to do....I decided to google "elbow pain" and found your videos. After months of increasing pain and stiffness my pain has all but disappeared after following your simple exercises...Thank you so very much! I can't wait to get back to painting and maybe even tennis! Keep up the good work, the videos are super!" Stacey, United States
You can do it too!
Click directly to any pain relief video on this page:
Intro,
Video 1,
Video 2,
Video 3 .
*Please Watch This Short Video First. Thanks.
Please visit the techniques page now, if you haven't already.
On the homepage I describe…in detail…the 3 Simple Steps and the 4 Basic Facts about your body that make it possible for you to provide your own joint pain relief.
Detailed Instructions For
Elbow Joint Pain Relief
Click directly to any pain relief video on this page:
Intro,
Video 1,
Video 2,
Video 3 .
Elbow joint pain is often one of the easiest joint problems to fix. Most often it's the bellies of certain muscles yanking on the joint.
Here's what we're going to do:
A. Tricep Release -

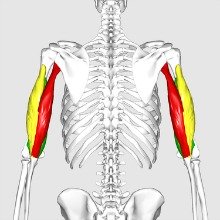
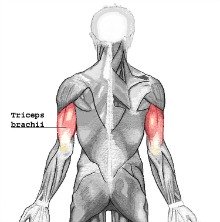
Take your fingers and press on one of the tender spots while you simultaneously straighten out and bend your arm. You'll notice that the muscles you are pressing on are the same ones that allow you to straighten your arm. Their tendons connect to your elbow joint and often cause elbow joint pain. By releasing the bellies of these muscles you can often instantly relieve your elbow joint pain.
Keep feeling up and down the back of your arm, pressing on any tender spots, and bending/straightening your arm at the same time until they have partially or completely released.
Notice if your elbow joint pain improves as you do it.
It may only be one tender (tender=tight!) spot in your tricep that is causing your elbow joint pain. Release that one spot and your pain could be gone. Release everything else and you improve the odds of your elbow joint pain not returning. After a few minutes give your working hand a break. Repeat this technique at least one more time before moving on. And feel free to mix in some of the press-pull-release technique on those tender spots as well.
Notice how much pain relief you've achieved.
B. Crux of Elbow Release -

Rest the hand of the elbow in pain onto your opposite thigh with your pinky on your thigh and your thumb toward the ceiling. Now take the thumb of your other hand and place in the crux of your elbow (the bend, the crease in your elbow) and press on the muscle toward the outer edge of the crux in your elbow.
With your thumb in the crux of your elbow, flex your elbow open and closed and feel the muscle that moves when you do that. Notice any tender spots in the tissue, and do the press-hold-move technique while you open and close your elbow joint.
Repeat this technique at least one more time before moving on. And feel free to mix in some of the press-pull-release technique on those tender spots as well.
Notice how much pain relief you've achieved for future reference.
C. Upper Foreman Release -
Sit in a chair that has arms of some kind, and rest your elbow, forearm, and hands (palms up) on the arms of the chair. Take your hand from the side that is not in pain and reach over and put your thumb in the area where your upper forearm and elbow come together.
Now we'll do the press-hold-move technique.
At the very top of your forearm feel for any tender muscle tissue. Most likely your supinator muscle is a bit tight. If you turn the palm of your hand from facing the ceiling to facing the floor, and repeat that motion, you'll be able to feel the muscle that does that motion under your thumb in your upper forearm. If that muscle in tender keep pressing on any tender spots while rotating your palm. Take a break after a minute or two of doing this to give your thumb a break. Repeat this technique at least one more time before moving on the Step 2. And feel free to mix in some of the press-pull-release technique on those tender spots as well.
Notice how much elbow joint pain relief this technique provides for future reference.
Click directly to any pain relief video on this page:
Intro,
Video 1,
Video 2,
Video 3 .
The nerves that govern your elbow come out of the vertebrae in your upper back. You can often achieve instant elbow joint pain relief by releasing muscles along the nerve pathway from your spine to your elbow.
Here's what we're going to do:
A. Upper Spine -
We'll start with the tennis-ball-press technique.
Place a tennis ball next to your spine in the tissue between your spine and the inside vertical edge of your shoulder blade. You stand to do this by leaning against a wall or you can lie on your back with the tennis ball on the floor.
Press the ball into the tissue in the area and investigate to find painful/tender/tight tissue.
Now add in our press-hold-move technique.You can slide your arm along the floor or wall, bend or twist. Do whatever it takes to get movement in the tissue you're applying the pressure to.
Was there noticeable elbow pain relief from this?
B. Upper Middle Back -
Now position the tennis ball in the space between your shoulder blade and your spine (rhomboid muscle), but not quite so close to your spine as the last technique. Move your arm in the same motion sliding it along the floor or wall like you just did last technique.
The right and left sides of your upper back should be worked on, especially on the rhomboid muscle between your spine and shoulder blade.
How much elbow pain relief did this provide?
C. Upper Outer Back -
Using the same techniques as 2A and 2B above, the only difference is that we'll be working with the muscle that covers the back surface of your shoulder blade (infraspinatus muscle).
Any tender spots you find get released with pressure from the tennis ball and moving your arm.
Notice how much elbow joint pain relief you achieve from this technique.
Repeat all of Step 2 and return to any tender spots that were a bit stubborn the first time. You may find that now they let go.
Notice how much elbow joint pain Step 2 provided for you for future reference.
Click directly to any pain relief video on this page:
Intro,
Video 1,
Video 2,
Video 3 .
You've already restored a great deal of joint muscle balance by completing Step 1 and Step 2……so let's finish the job.
Here's what we're going to do:
A. - Underside of Collarbone -
I work the underside of my collarbone a lot because the nature of my work tends to make this area tight over time. I always use press-pull-release technique. along with hand-on-hand technique.
It's pretty straightforward, just feel for any painful tissue when you press on it with your fingertips and then do the above techniques to get the tissue to release.
The press-pull-release technique can also help, so mix and match as you see fit.
Notice how much pain relief this technique achieves.
B. Mid Foreman Release -
We'll be using the press-hold-move technique.
Sit in a chair that has arms of some kind, and rest your elbow, forearm, and hands (palms up) on the arms of the chair. Take your hand from the side that is not in pain and reach over and put your thumb in the area in the middle of your forearm. Feel for any tender muscle tissue in this area.
Open and close your fist as you press into any tender spots with your thumb. If the muscle is tender keep pressing on any tender spots while opening and closing your fist.
Take a break after a minute or two of doing this to give your thumb a break.
Repeat all of Step 3 at least one more time before moving on.
Notice how much elbow joint pain relief this technique provides for future reference.
Self-Assessment Of
Elbow Joint Pain Relief
Was there one specific elbow joint pain treatment that instantly relieved your pain?
Are you still experiencing some elbow joint pain?
Which muscles are still tender (that means they are tight!) and could use some more work?
Investigate a bit and you'll eventually find which techniques work best for you to provide the best elbow joint pain relief. Then you'll be able to fix yourself whenever you desire!
Return from this Elbow Joint Pain Relief page to the
Do-It-Yourself Joint Pain Relief Homepage
Elbow Pain Relief Success Story, From Tim
"I owe so much gratitude to you!! I love weight training and bodybuilding an have struggled with wrist/elbow/shoulder pain in my right side of my body for almost two years now. Been to the chirorpractor, doctor, etc and all they do is a little work and then recommend time out of the gym. I never listened because i got frustrated they never helped me. Your guides have provided me with so much relief!!! thank you so so much will be using these techniques forever." - Tim, United States
This Free Pain Relief Website
By Clicking On Your Favorite Icon Below:
Add Gary Crowley to your Google Plus Circles -
Google+ (click here)
Copyright © 2011 - 2022 DiyJointPainRelief.com


