Lower Back Pain Remedy -
Releasing "The Front Of Your Back"

Just follow along with the videos below.
Go directly to either video on this page with these links: Intro, Video 1.
This short introductory video is a great place to start. It will give you a good overview of how to get the most out of this website and help you get the best possible results from the videos below.
Click directly to any pain relief video on this page:
Intro,
Video 1.
*Please Watch This Short Video First. Thanks.
Please visit the techniques page now, if you haven't already.
On the homepage I describe…in detail…the 3 Simple Steps and the 4 Basic Facts about your body that make it possible for you to provide your own joint pain relief.
Detailed Instructions For:
Lower Back Pain Remedy -
Releasing "The Front Of Your Back"
Click directly to any pain relief video on this page:
Intro,
Video 1.
Releasing "The Front Of Your Back"
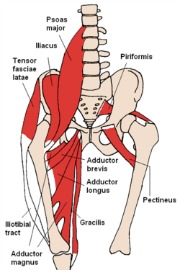
The muscles on the "front of your back" (the psoas muscle and the iliacus muscle) is new territory for most folks, so just go slowly and gently, and you'll do great.
When you've done a thorough job with the 3 Simple Steps, and your lower back pain, groin pain, achilles tendon, or foot pain, etc. still lingers, sometimes releasing "the front of your back" can be the final release that is needed to set that last bit of lower back pain free. So let's get to it.
Here's what we're going to do:
Inner Hip Release
Your iliacus is the first muscle we'll investigate and release. And the press-pull-release technique combined with the hand-on-hand technique will be our main tools.
As shown in the video, while lying on your back, locate the pointy ASIS part of your hip bone.
Now, bring your finger tips in about an inch toward your belly button.
Next, press your fingertips down and in at about a 45 degree angle and press into your iliacus muscle and search for tight tissue along your iliacus from your ASIS all the way down to the outer edge of your pubic bone.
Release any tight tissue you find on both your left and right iliacus.
How much does this one lower back pain remedy help your pain symptoms?
Side of Spine Release
The psoas muscle is next on our agenda. For this muscle we'll use a slightly different, but similar approach. The press-hold-move technique with a modified hand-on-hand technique will be our main tools to release your psoas muscle.
About one inch to the side of you belly button, press gently, but deeply into your belly as you lie on the floor.
With your abdominal muscles remaining relaxed, tuck your tailbone up toward the ceiling and then relax and let it come back down to the floor. Do this motion continually as press your fingertips into your belly about 1 inch to the side of your belly button from your belly button all the way down to just above your pubic bone.
Take as much time as you require to release any tight tissue you find on both the left and right sides of your spine.
How much does this one lower back pain remedy help your pain symptoms?
Self-Assessment For
Lower Back Pain Remedy:
"Releasing The Front Of Your Back"
Which techniques gave you the most pain relief?
Did Step 1, Step 2, or Step 3 work best?
Was there one specific lower pain treatment that instantly relieved your pain? Remember what worked best for you, so you can do that first next time you need it.
Are you still experiencing some lower back pain?
Which muscles are still tender (that means they are too tight!) and could use some more work?
Go back and repeat those techniques that seem to need a few more rounds. You may be pleasantly surprised at the results you get now that you've released other muscles that may prevented them letting go on the first attempt.
Investigate a bit and you'll eventually find which techniques work best for you to provide the best lower back pain relief. Then you'll be able to fix yourself whenever you desire because you'll have your own personalized lower back pain remedy……literally at your fingertips!
To visit the Best Groin Stretches page (click here)
To visit the main Lower Back Pain Relief page (click here)
Return from this Lower Back Pain Remedy page to the
Do-It-Yourself Joint Pain Relief Homepage
This Free Pain Relief Website
By Clicking On Your Favorite Icon Below:
Add Gary Crowley to your Google Plus Circles -
Google+ (click here)
Copyright © 2011 - 2022 DiyJointPainRelief.com


