Running Lower Back Pain Relief

I'm going to focus on those key muscle groups in the videos below. You'll learn how to assess and release each potential cause of your pain.
Go directly to any of the Running Lower Back Pain Relief videos with these links:
Intro,
Video 1,
Video 2,
Video 3,
Video 4,
Video 5 .
Click directly to any pain relief video on this page:
Please visit the techniques page now, if you haven't already.
On the homepage I describe…in detail…the 3 Simple Steps and the 4 Basic Facts about your body that make it possible for you to provide your own joint pain relief.
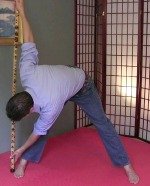
A. Standing Hamstring Stretch and Assess -
If you want additional recommendations for hamstring stretches, please visit my Best Hamstring Stretches page.
That said, when it comes to stretching your hamstrings, one of the most important pieces of advice I can give you is - "Don' Cheat!" I don't know why so many people tend to cheat when they stretch their hamstrings when they don't tend to cheat stretching any other muscle group, but they do.
So the way to not cheat is to have straight legs the entire time you do this stretch. People seem to want to get just a bit closer to the floor with their hands, so they start bending their knees. And once they start bending their knees they lose all the leverage they have on their hamstrings and are now stretching the ligaments in their lower back.
Some critics claim that the stretch I show you in these videos is "bad for your back," but this stretch is only bad for your back if you don't flex your thighs, which I emphatically tell you to do, and if you bend your knees, which emphatically tell you to not do.
When done properly, and now you will certainly do this stretch properly, this is an extremely effective hamstring stretch.
How much running lower back pain relief does stretching your hamstrings produce?
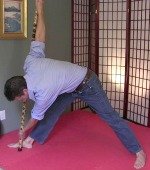
B. Stick Stretches for Hamstrings -
For more demonstrations of "stick stretching" feel free to visit my Lower Back Pain Relief Exercises With A Stick page.
If you don't have a stick then the other two stretches in this section will get the job done, but I would be remiss if I didn't show you these stretches. If you take the time to learn them you can go much deeper and create a lot more leverage to stretch these muscles.
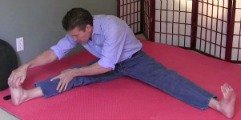
C. Seated Hamstring Adductor Stretch -
Sit on the floor with straight legs spread as wide open as you can while up straight. Now, while flexing your quads (thighs) and keeping your feet pointed upward toward the ceiling, alternate bending your upper body to the side over each leg while trying to grasp your foot with one or both hands.
Most runners don't realize how much tight adductors can limit the length of your stride. If you think about it for a moment, you can see how tight groin will limit how far forward your knee can go out in in front of you. It's no different than if you adductors were a rope that only had so much length to extend before it limited your movement.
By freeing your adductors you will not only reduce the amount of torque on your lower back with each stride you take, but you will quite literally be able to have a longer stride. By adding 1 or 2 inches to each stride you take you can go a lot faster basically the same amount of effort, so don't skimp on these adductor stretches.
Also, if you you're interested, check out my Best Groin Stretches page, where I'll show you even more ways to free those very important adductor muscles.
Here's what we are going to do:
A. Stretch, Assess and Release Tight Tissue In Hips
For a great review of this technique please visit the Pelvic Girdle Pain Relief page. It's one of my most popular pages.
This "stretch and assess" method I show in this video is something I just naturally started doing when doing my hip stretches and my sports ball release of my hips. I found that if I stretched first, and then noticed specifically where I was tight, and then used the sports ball to release those specific spots....I could get a lot of work done in a very short period of time.
I hope you'll give it a try. It has proved profoundly useful for me.
How much running lower back pain relief did this one technique provide? Perhaps a lot!
Your big outer thigh muscle called your vastus lateralis is a common culprit for s i joint pain. When it's tight it torques the head of your femur (thigh bone) and yanks on your sacrum (tailbone) via a your sacrotuberous ligament that attaches to both bones. It literally yanks your sacroiliac joint out of position all way from your thigh, which makes it hurt. This thigh muscle is very difficult to access with stretching, and it's a muscle that's used a lot, so it's a common cause of your pain.
The second focus will be on the muscle and its tendon run down the outside of your thigh. The muscle is called your tensor fasciae latae and the tendon is commonly called your "I T Band" (iliotibial band) . When they are tight they pull your sacroiliac joint apart by yanking your hip bone downward and away from tailbone.
Here's what we're going to do:
A. Outer Thigh Muscle Release -
Go up and down the outer 1/3 of your thigh with the hand-on-hand technique and the press-pull-release technique and release any tight tissue you find from your knee to your hip.
This big vastus lateralis muscle should be given a great deal of attention if it's tight. A tight vastus lateralis can torque your femur, which torques your sacrotuberous ligament, which yanks on the bottom of your sacrum, which yanks on the SI Joint on the opposite side. It's may seem complicated, but really it's just like the rigging on a sailboat with different pieces yanking on things an affecting other things.
Do this on both your left and right thigh.
B. Side of Leg Release -
Once again, use the hand-on-hand technique with the press-pull-release technique to release any tight tissue from the side of your knee all the way up to the side of your hip.
When this muscle and this tendon is tight it will yank downward on the outside edge of your hip bone. That in turn, will yank on your SI Joint, which may be the very pain you are feeling.
Notice the amount of running lower back pain relief this one technique provides.
A. Inner Hip Release & B. Side of Spine Release
Here we'll be using the combination of the press-pull-release technique
and the
press-hold-move technique. And with both of these techniques we'll be adding the hand-on-hand technique to enhance the release of any tight tissue we find.
For another detailed review of this please visit my Release The Front Of Your Back page.
Notice the amount of running lower back pain relief you experience from doing this inner hip and spine release.
For all the muscle groups and general area below, we're going to use the same basic method of freeing the tissue called the tennis-ball-press technique.
Basically, find a tender/painful locations by using your bodyweight to press onto a tennis ball. When you find a good spot to release then do the press-hold-move technique by raising, lowering, twisting your leg in a manner that will force the area you are pressing on to move a bit, and thus, release the tight tissue.
A. Inner Spinal Muscle Release -
Place the tennis ball in your lower back area on the right and left edges of your spine to find tight tissue.
B. Outer Spinal Muscle Release -
In the space two to three inches from your spine in your lower back area, use a tennis ball to investigate the area for tight tissue and release it.
C. Tailbone Release -
Lie on your side and put the tennis ball under your Tensor Fascia Latae Muscle. It's located in the space between the top of your hip bone and the top of your thigh bone (femur). Release any tension your find, on both sides of your body, using the tennis ball.
Notice the amount of running lower back pain relief this one technique provides.
What techniques seemed to give you the most relief?
What areas need more work?
If your Running Lower Back Pain Relief is not yet complete, then just stick with it, be patient and persistent, and you'll get there soon!
You can do it!
To visit the main Lower Back Pain Relief page (click here)
To visit the Best Groin Stretches page (click here)
Copyright © 2011 - 2022 DiyJointPainRelief.com
This short introductory video is a great place to start.
Intro,
Video 1,
Video 2,
Video 3,
Video 4,
Video 5 .
Detailed Instructions For
Running Lower Back Pain Relief
Click directly to any pain relief video on this page:
Intro,
Video 1,
Video 2,
Video 3,
Video 4,
Video 5 .
Running Lower Back Pain Relief
So here's what we're going to do:


Click directly to any pain relief video on this page:
Intro,
Video 1,
Video 2,
Video 3,
Video 4,
Video 5 .
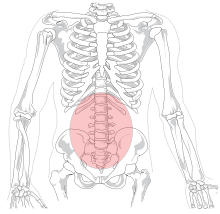
Running lower back pain can often be caused by the muscles on the front of your spine and pelvis being tight. So, we're going to make sure they are not inappropriately tight.
Click directly to any pain relief video on this page:
Intro,
Video 1,
Video 2,
Video 3,
Video 4,
Video 5 .
So here's what we're going to do:
The first thing we want to do is release the two muscle groups that often play a major role in yanking your lower back and causing your pain. And we'll be doing this on BOTH sides of the body.
Click directly to any pain relief video on this page:
Intro,
Video 1,
Video 2,
Video 3,
Video 4,
Video 5 .
Here's what we're going to do:
Click directly to any pain relief video on this page:
Intro,
Video 1,
Video 2,
Video 3,
Video 4,
Video 5 .
Here's what we're going to do:
Self-Assessment For
Running Lower Back Pain Relief
This Free Pain Relief Website
By Clicking On Your Favorite Icon Below:
Add Gary Crowley to your Google Plus Circles -
Google+ (click here)


