Upper Back Pain Relief:
Massage Tool Release

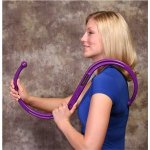
Upper back pain relief using a massage tool can be very effective, in most cases. The pain relief you seek can often be effectively achieved using an inexpensive massage tool, The Backnobber II...at Amazon.com (click here).
This is a great complement to what I show you on the main upper back pain relief page. There I show you how use a tennis ball to get your tissue to release, but this is a great tool, if you sit at a computer all day and need some regular work on your upper back.
Go directly to any Upper Back Pain Relief video on this page by clicking these links: Intro, Video 1.
This short introductory video is a great place to start. It will give you a good overview of how to get the most out of this website and help you get the best possible results from the videos below.
Click directly to any pain relief video on this page:
Intro,
Video 1.
*Please Watch This Short Video First. Thanks.
Please visit the techniques page now, if you haven't already.
On the homepage I describe…in detail…the 3 Simple Steps and the 4 Basic Facts about your body that make it possible for you to provide your own joint pain relief.
Detailed Instructions For
Upper Back Pain Relief -
Massage Tool Release
Click directly to any pain relief video on this page:
Intro,
Video 1,.
Any of the techniques presented in the above video can be used in conjunction with the main upper back pain page.
Here's what we're going to do:
Release Intersection of Neck and Shoulders -
Thepress-hold-move technique is our main tool for this area. Also, remember that the main neck and shoulder pain relief page can also be incorporated to assist releasing any really stubborn areas.
Spinal Muscle Release 1 - Bending Forward and Back
The press-hold-move technique performed with the knob of the massage tool is basically what we are doing here.
In this first phase we have you pressing into the tight tissue you find and then bending forward and back in order to get that tight back tissue you are pressing on to release.
Spinal Muscle Release 2 - Twisting
And now we repeat the process of finding tender tight tissue with the knob of the tool and instead of bending forward and back, we twist to do thepress-hold-move technique and get the tissue to let go.
Get Creative With Your Movements -
Lastly, do anything else you can think of to access and cause movement in the remaining tight tissue press-hold-move technique. Move your arms, head and neck if that helps the tissue to release.
Notice any tender spots you find that give you substantial pain relief.
Self-Assessment
Did Step 1, Step 2, or Step 3 work best?
Was there one specific treatment that instantly relieved your pain? Remember what worked best for you, so you can do that first next time you need it.
Which muscles are still tender (that means they are too tight!) and could use some more work?
Go back and repeat those techniques that seem to need a few more rounds. You may be pleasantly surprised at the results you get now that you've released other muscles that may prevented them letting go.
Return to the main Upper Back Pain Relief page.
Return to the Do-It-Yourself Joint Pain Relief Homepage
This Free Pain Relief Website
By Clicking On Your Favorite Icon Below:
Add Gary Crowley to your Google Plus Circles -
Google+ (click here)
Copyright © 2011 - 2022 DiyJointPainRelief.com


